In honor of my new webshop that launched yesterday, I needed to make a decadent recipe that celebrated some of Norway’s most famous recipes: the marzipan cake!
Did you know that nearly half of all cakes sold in Norway are some version of ‘marsipankake’? That’s one million cakes (and there are only 5 million Norwegians:)
and over 3 times the sale of the second most popular cake in Norway, the chocolate cake.
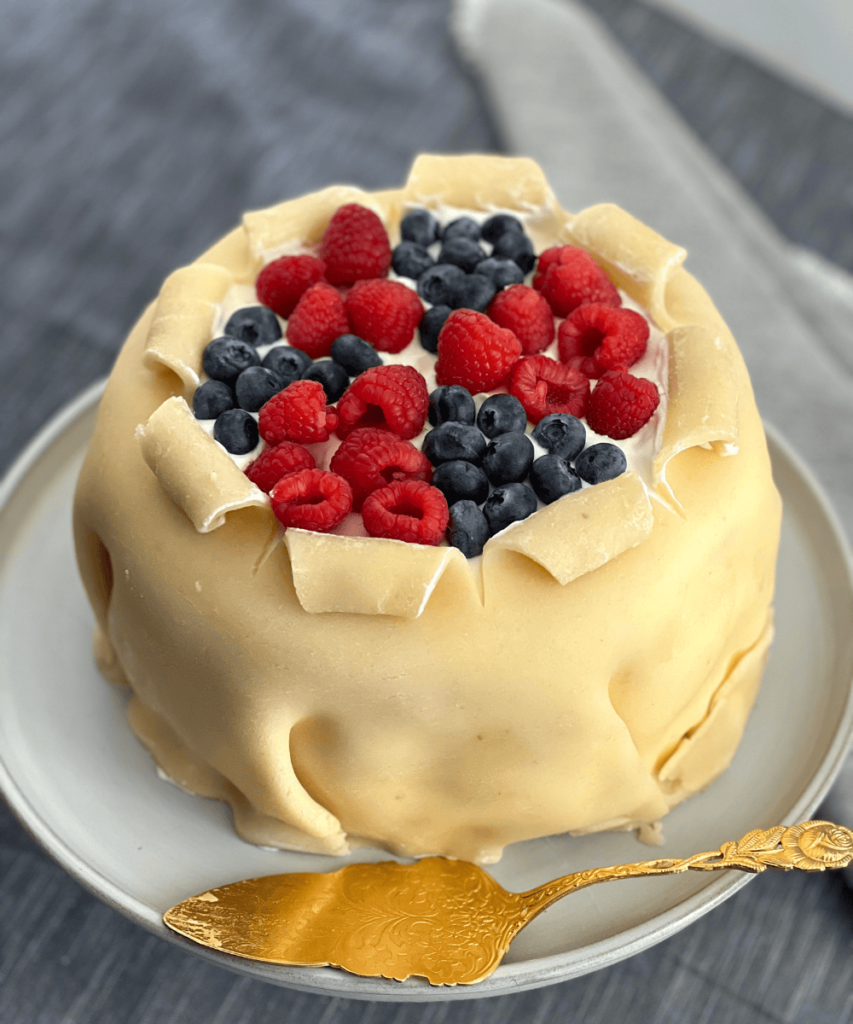
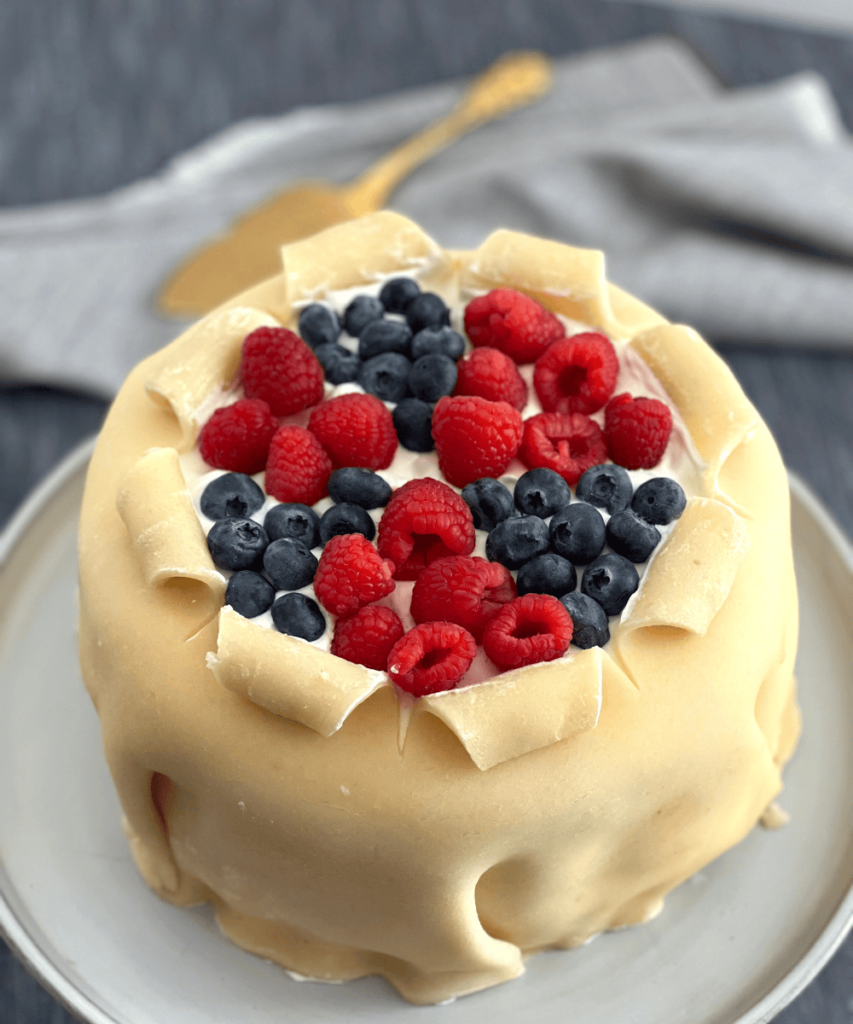
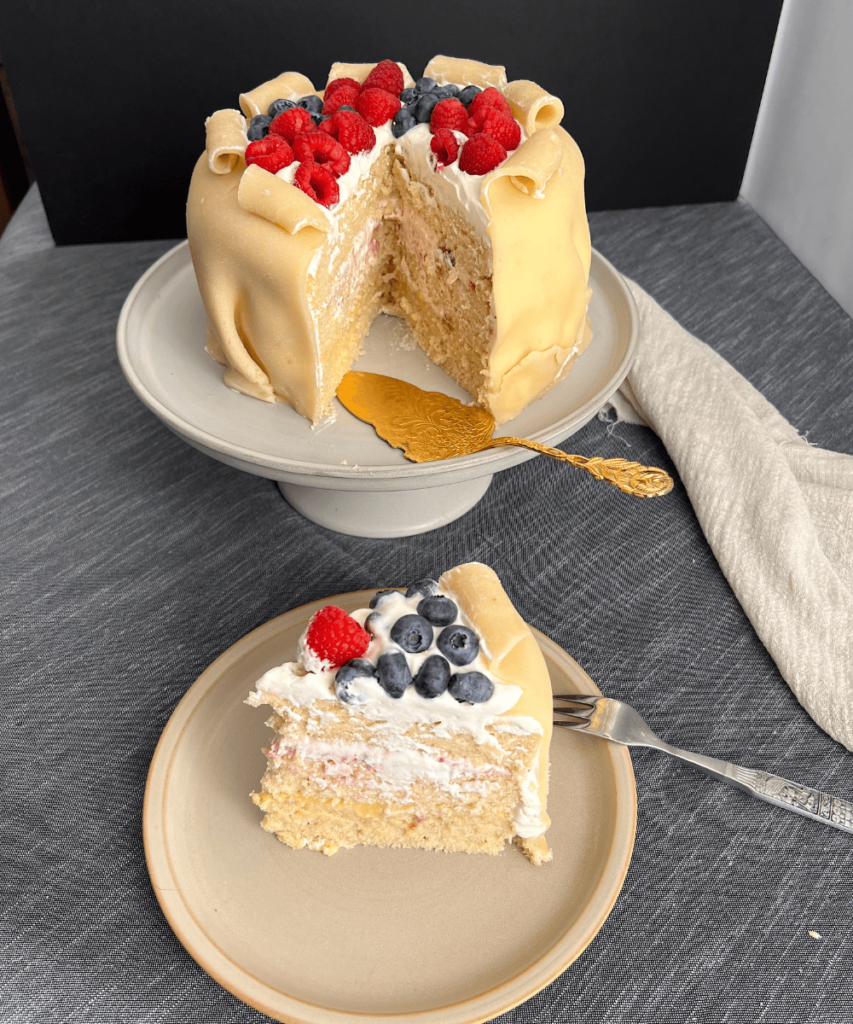
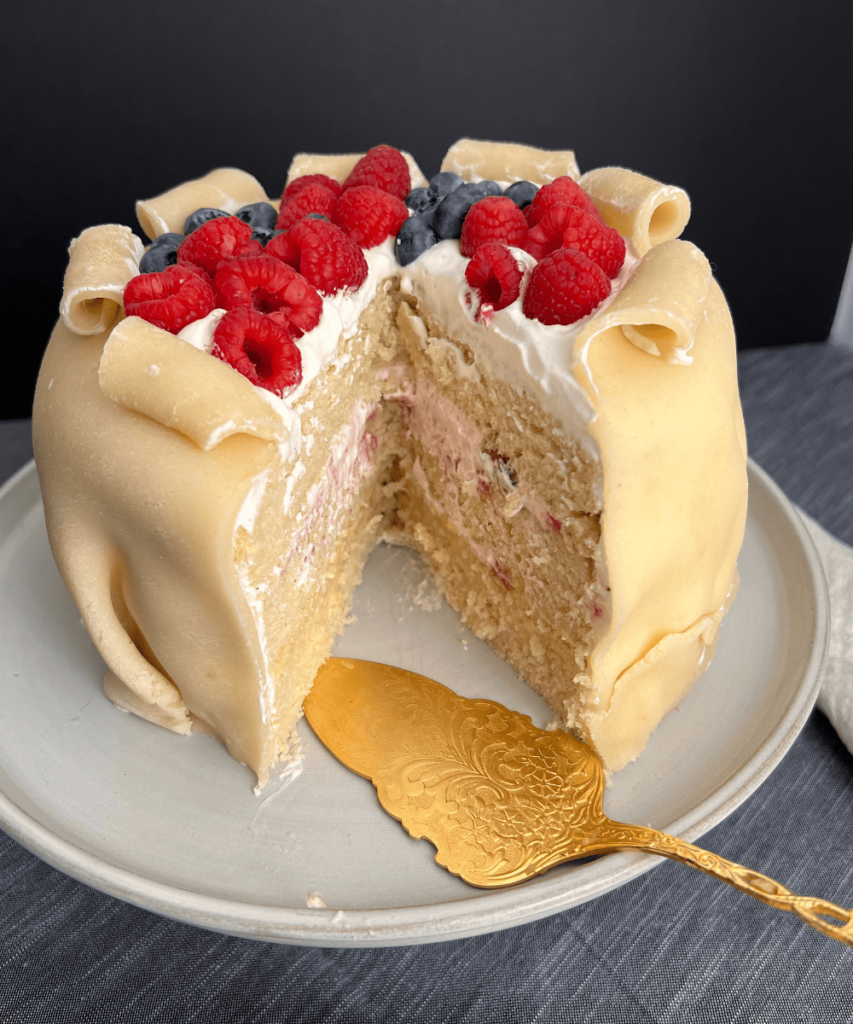
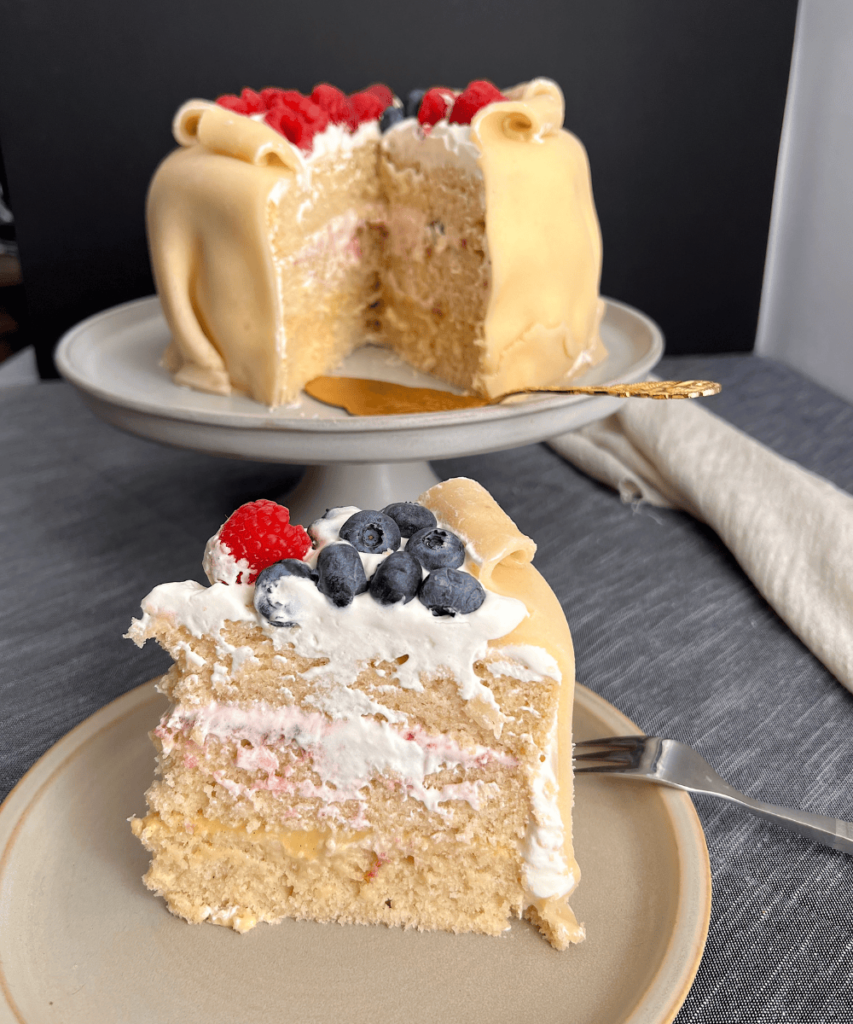
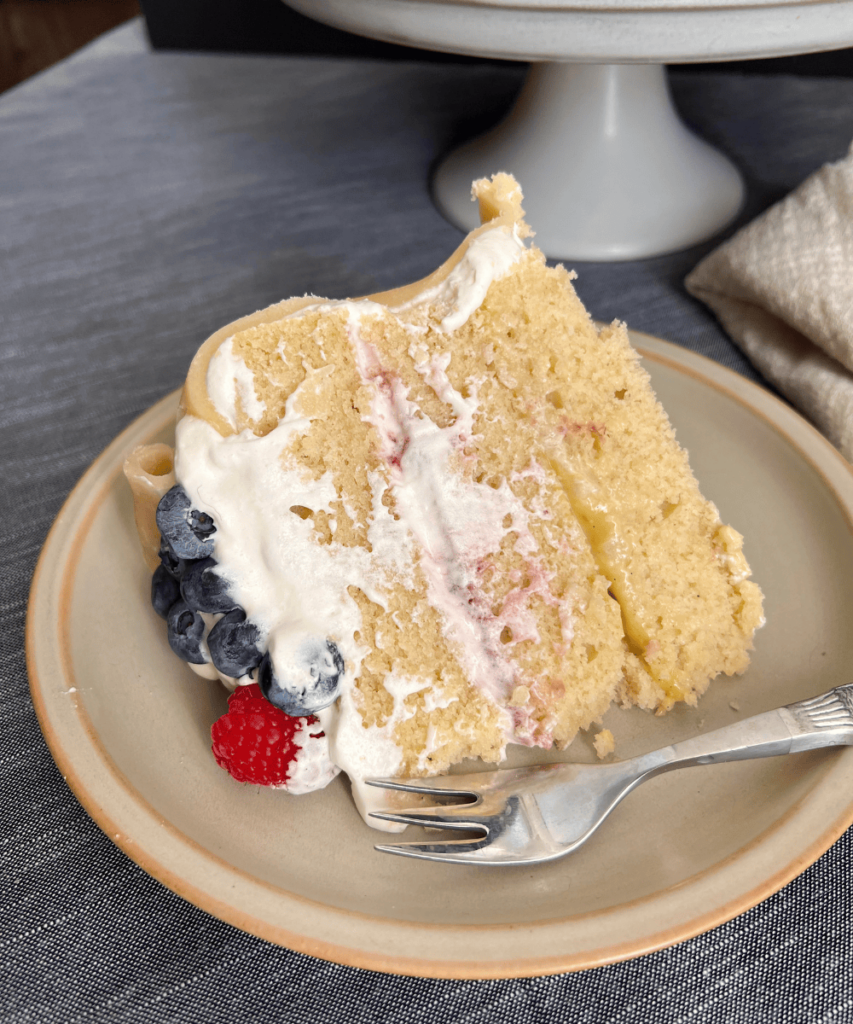
The marzipan cake is a sponge cake layered with whipped cream, some type of jam or vanilla custard and has 3 layers. Then it’s wrapped in a thin layer of marzipan and decorated with more berries and cream on top. That is of course the classic version but there are many versions.
Believe it or not, I have never attempted making a marzipan cake before, and certainly not a vegan version but I’m thrilled to say that this recipe came out way better than anticipated. Spoiler alert: I wasn’t successful on the first try, so don’t feel bad if you find this a tad challenging, just don’t give up! Even if it doesn’t look beautiful on your first try it will still taste amazing, I promise!
That said, I won’t lie, this recipe is not a “whip it up in a minute” kind of recipe, and will take a bit of skill to master. But it will be so worth it when you put this on the table.
Why is marsipankake so popular?
Firstly, you can decorate it any way you want. Because the topping is marzipan which is dry and stable, you can even print a photo of something on top of it (as opposed to a cream cake). Have fun with it!
Secondly, it’s a layered cake as I mentioned earlier that you can fill with anything you want: from different jams, to vanilla custard, chocolate and more… it can be made to anyone’s taste!
Thirdly, it’s the ultimate party cake! Nothing looks as fancy and decadent as a marzipan cake. It is the perfect cake for the upcoming Easter holiday or May 17th celebration (as the colors are red, white and blue as in the Norwegian flag) and any other special occasions such as birthday parties, anniversaries, weddings, confirmations and more.
Now on to the cake baking:
While you don’t strictly need specialty tools to make this cake, I highly recommend them to make the process go smoother.
For any cakes you want decorate, I would invest in a sturdy stainless cake turntable – it makes it so much easier to produce great results.
Additionally I would get some cake rounds that you can place on to the cake turntable and safely transfer the cake to whatever serving vessel/cake stand you want to present the cake on.
I found that an adjustable cake ring helps keep the layers evenly in place as you go through the assembly process. You can easily remove the ring once you’re ready to cover the cake with the additional whipped cream and marzipan.
A good serrated knife is also essential to slice cakes in half or even out layers.
When making this cake or any cake with whipped cream or buttercream, piping bags and some tips are also great tools to have on hand for pretty and easy results.
Finally, another cheap little nifty thing is a cake smoother that helps you even out the marzipan layers on top and on the side of the cake. You can use this same vessel for any cakes you decorate with buttercream or fondant of any kind.
*Please note I get a small commission for every link provided in this blog post.

NORVEGAN MARSIPANKAKE
Makes 1 x 3 layer 9-inch cake
For the sponge cake:
2 cups (5 dl) plain non-dairy milk (I prefer organic soy)
2 tablespoons white vinegar
¼ cup (60 ml) water, room temperature
2 teaspoons vanilla bean paste
250 grams (9 oz) vegan butter
½ cup (100 grams) granulated sugar
3 cups (450 grams) all-purpose flour
1 tablespoon baking powder
1 teaspoon baking soda
½ teaspoon salt
Preheat oven to 350℉ (175℃). Grease and line 3 x 9 inch (23cm) round cake pans with parchment paper and set aside. I like to spray with a little oil on the parchment paper and dust with a little flour and shake out the excess.
Combine the non-dairy milk with the white vinegar and let sit until it starts to curdle, about 5 minutes. Then add in the water and vanilla paste.
In a stand mixer fitted with the paddle attachment, add the butter and sugar and cream on high speed until light and fluffy, about 2 minutes or so. Stop in between and scrape down with a spatula as needed.
In a separate bowl, sift together the flour, baking powder, baking soda and sea salt and combine well.
With the stand, add in one third of the liquid mixture, followed by one third of the flour mixture, then liquid, then flour until everything is just combined (don’t overmix).
Divide the batter among the three prepared cake pans. If you want, you can weigh the pans to make sure you have an accurate amount in each pan. Smooth the batter out in each pan using an offset spatula and bang the pan lightly down against the table to make sure there are no air pockets in the batter.
Bake in the middle of the oven for about 30 minutes, until a cake tester comes out clean when inserted into the center of each cake.
Let cool on a rack for about 10 minutes, before carefully lifting them out of the cake pans. Let cool completely. You can bake the sponge cakes the day before, and assemble the next day if you’d like, then just wrap them tightly in plastic wrap and place in fridge until you are ready to assemble the cake.
For the marzipan cover:
350 grams marzipan (I like the Odense brand)

For the vanilla custard layer:
1 ½ cups (3.5 dl) non-dairy milk (I recommend oat, soy, almond or cashew)
¾ cups (1.75 dl) non-dairy cream (I love Violife’s heavy whipping cream or you can also use a vegan creamer)
3 tablespoons cornstarch or potato starch
½ cup (100 grams) granulated sugar
Pinch of saffron and /or pinch of ground turmeric (for color – optional)
2 teaspoons vanilla extract or paste
In a medium heavy bottomed pot, add all the ingredients except the vanilla extract on medium heat. Whisk constantly, getting rid of any lumps. The mixture will start to thicken, this will take about 3-5 minutes. Once the mixture is thick and smooth and a spatula runs clean the custard is done. Remove from heat, and add in the vanilla extract and whisk to combine.
To cool down the custard and prevent it from clumping up, I like to place the pan in the kitchen sink or in a larger bowl with ice cold water that reaches up to ¾ of the pan and keep whisking the custard for about 5 minutes until it’s cooled down. Set aside until ready to use.
*Note you can also use arrowroot or tapioca starch for a thickener, substitute equal amounts.

For the strawberry whipped cream layer:
2 cups (5 dl) vegan heavy whipping cream (I recommend Violife)
3 tablespoons powdered sugar
1 teaspoon vanilla extract
1 cup (2.5 dl) strawberry jam, plus extra for layering on cake
In a stand mixer fitted with the whisk, add the heavy whipping cream, powdered sugar and vanilla extract and whisk on high speed for 3-4 minutes until you have the consistency you want.
Add half of the whipped cream into a large bowl and carefully fold in the strawberry jam. Reserve the remaining plain cream for decorating the outside of the cake.

Assemble the cake:
Using a sharp, serrated knife, cut off a thin layer off the top of each cake to even out the surface.
Place some of the plain whipped cream into a piping bag,
Place a cake board on top of your cake roundtable, pipe a little circle of cream on the cake round and place the first layer on top. Spread the chilled vanilla custard evenly over the top, then place the second cake layer on top. If using a cake ring, you can put that on once you put the first layer down.
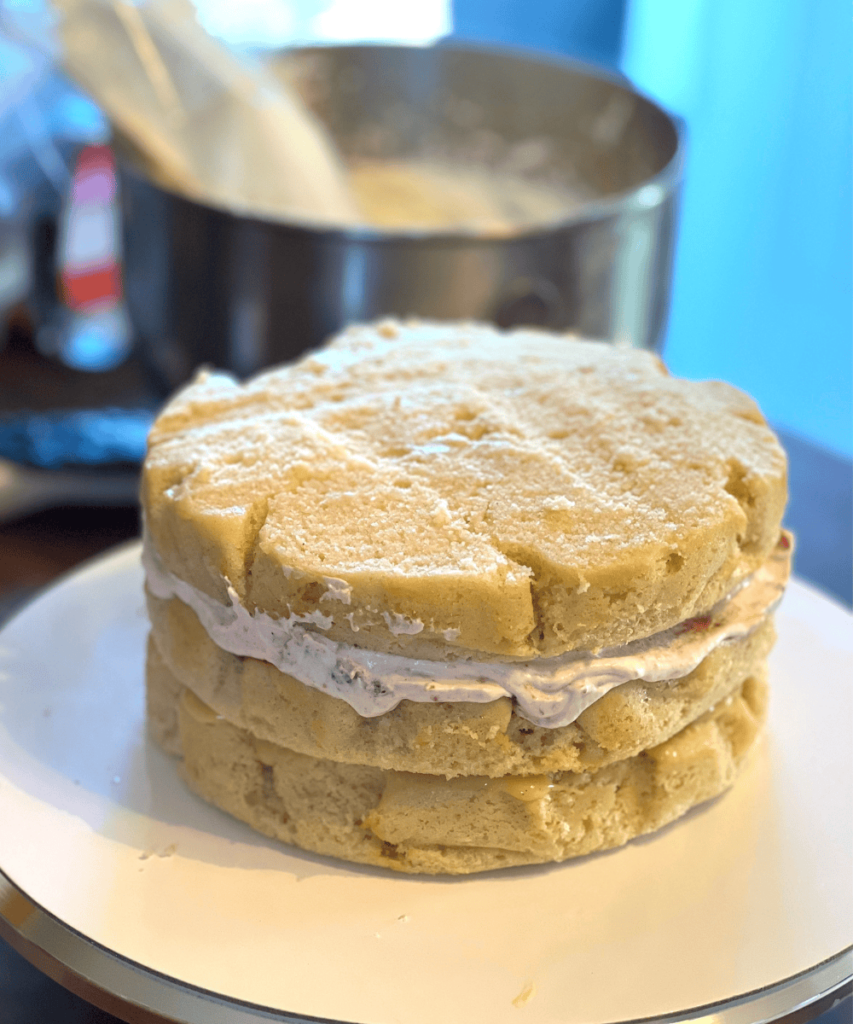
Using an offset spatula, spread a little thin layer of strawberry jam on top, then spread the strawberry whipped cream on top. Place the final cake layer on top of that, place the plain whipped cream on and smooth out over the top and sides of the entire cake.
Using a rolling pin, roll the marzipan out on a clean working surface sprinkled with a little flour, to about ¼ inch (0.5cm) in thickness. Gently roll the marzipan layer using the rolling pin and transfer onto the cake, unfold and tuck it carefully around the edges of the cake.
Use a smoother to smooth the marzipan out on top and around the sides. Use a sharp knife to cut any excess marzipan off around the edges.
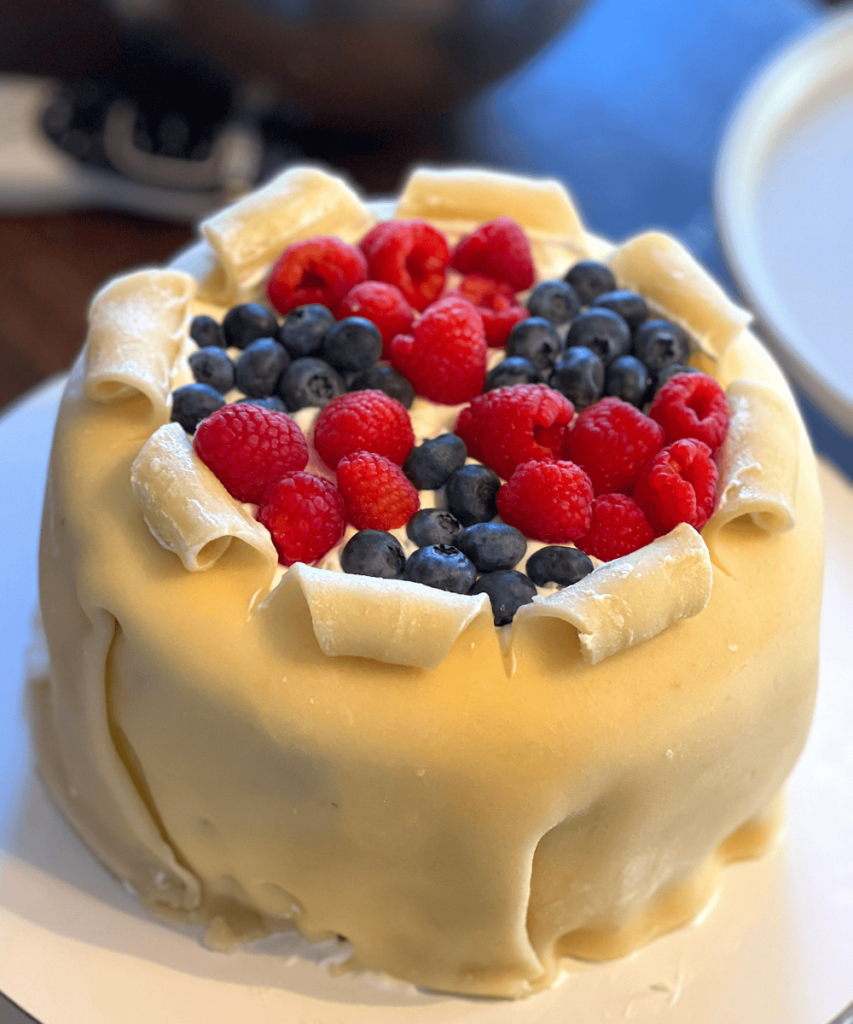
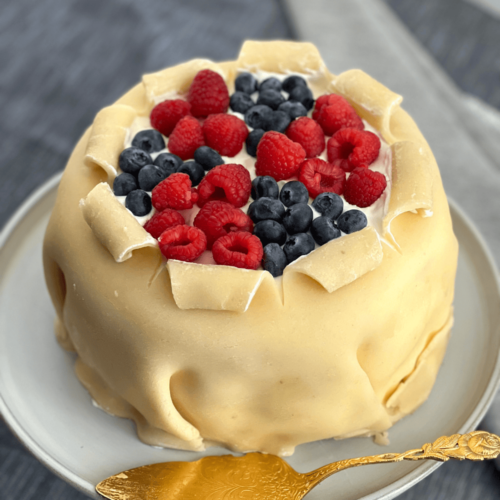
Decorate the cake any way you want, either by cutting into the marzipan and rolling back some of the layer and placing berries of your choice (I used blueberries and raspberries) and pipe additional cream on top.
NORVEGAN MARSIPANKAKE
Ingredients
- For the sponge cake:
- 2 cups (5 dl) plain non-dairy milk (I prefer organic soy)
- 2 tablespoons white vinegar
- ¼ cup (60 ml) water, room temperature
- 2 teaspoons vanilla bean paste
- 250 grams (9 oz) vegan butter
- ½ cup (100 grams) granulated sugar
- 3 cups (450 grams) all-purpose flour
- 1 tablespoon baking powder
- 1 teaspoon baking soda
- ½ teaspoon salt
- For the Marzipan Layer:
- 350 grams (12 oz) marzipan I like the Odense brand
- For the Vanilla Custard Layer:
- 1 1/2 cups (3.5 dl) non-dairy milk like soy, oat or cashew
- 3/4 cups (1.75 dl) non-dairy heavy cream or creamer
- 3 tbsp cornstarch or sub potato starch
- 1/2 cup (100 grams) granulated sugar
- pinch saffron or turmeric for color optional
- For the strawberry whipped cream layer:
- 2 cups (5 dl) vegan heavy whipping cream like Violife or Silk
- 3 tbsp powdered sugar
- 1 tsp vanilla extract
- 1 cup (2.5 dl) strawberry jam
Instructions
- Preheat oven to 350℉ (175℃). Grease and line 3 x 9 inch (23cm) round cake pans with parchment paper and set aside. I like to spray with a little oil on the parchment paper and dust with a little flour and shake out the excess.
- Combine the non-dairy milk with the white vinegar and let sit until it starts to curdle, about 5 minutes. Then add in the water and vanilla paste.
- In a stand mixer fitted with the paddle attachment, add the butter and sugar and cream on high speed until light and fluffy, about 2 minutes or so. Stop in between and scrape down with a spatula as needed.
- In a separate bowl, sift together the flour, baking powder, baking soda and sea salt and combine well.
- With the stand, add in one third of the liquid mixture, followed by one third of the flour mixture, then liquid, then flour until everything is just combined (don’t overmix).
- Divide the batter among the three prepared cake pans. If you want, you can weigh the pans to make sure you have an accurate amount in each pan. Smooth the batter out in each pan using an offset spatula and bang the pan lightly down against the table to make sure there are no air pockets in the batter.
- Bake in the middle of the oven for about 30 minutes, until a cake tester comes out clean when inserted into the center of each cake.
- Let cool on a rack for about 10 minutes, before carefully lifting them out of the cake pans. Let cool completely. You can bake the sponge cakes the day before, and assemble the next day if you’d like, then just wrap them tightly in plastic wrap and place in fridge until you are ready to assemble the cake.
- To make the vanilla custard:
- In a medium heavy bottomed pot, add all the ingredients except the vanilla extract on medium heat. Whisk constantly, getting rid of any lumps. The mixture will start to thicken, this will take about 3-5 minutes.
- Once the mixture is thick and smooth and a spatula runs clean the custard is done. Remove from heat, and add in the vanilla extract and whisk to combine.
- To cool down the custard and prevent it from clumping up, I like to place the pan in the kitchen sink or in a larger bowl with ice cold water that reaches up to ¾ of the pan and keep whisking the custard for about 5 minutes until it’s cooled down. Set aside until ready to use.
- To make the strawberry whipped cream layer:
- In a stand mixer fitted with the whisk, add the heavy whipping cream, powdered sugar and vanilla extract and whisk on high speed for 3-4 minutes until you have the consistency you want.
- Add half of the whipped cream into a large bowl and carefully fold in the strawberry jam. Reserve the remaining plain cream for decorating the outside of the cake.
- Assemble the cake:
- Using a sharp, serrated knife, cut off a thin layer off the top of each cake to even out the surface. Place some of the plain whipped cream into a piping bag.
- Place a cake board on top of your cake roundtable, pipe a little circle of cream on the cake round and place the first layer on top. Spread the chilled vanilla custard evenly over the top, then place the second cake layer on top. If using a cake ring, you can put that on once you put the first layer down.
- Using an offset spatula, spread a little thin layer of strawberry jam on top, then spread the strawberry whipped cream on top. Place the final cake layer on top of that, place the plain whipped cream on and smooth out over the top and sides of the entire cake.
- Using a rolling pin, roll the marzipan out on a clean working surface sprinkled with a little flour, to about ¼ inch in thickness. Gently roll the marzipan layer using the rolling pin and transfer onto the cake, unfold and tuck it carefully around the edges of the cake.
- Use a smoother to smooth the marzipan out on top and around the sides. Use a sharp knife to cut any excess marzipan off around the edges.
- Decorate the cake any way you want, either by cutting into the marzipan and rolling back some of the layer and placing berries of your choice (I used blueberries and raspberries) and pipe additional cream on top.


0 Comments