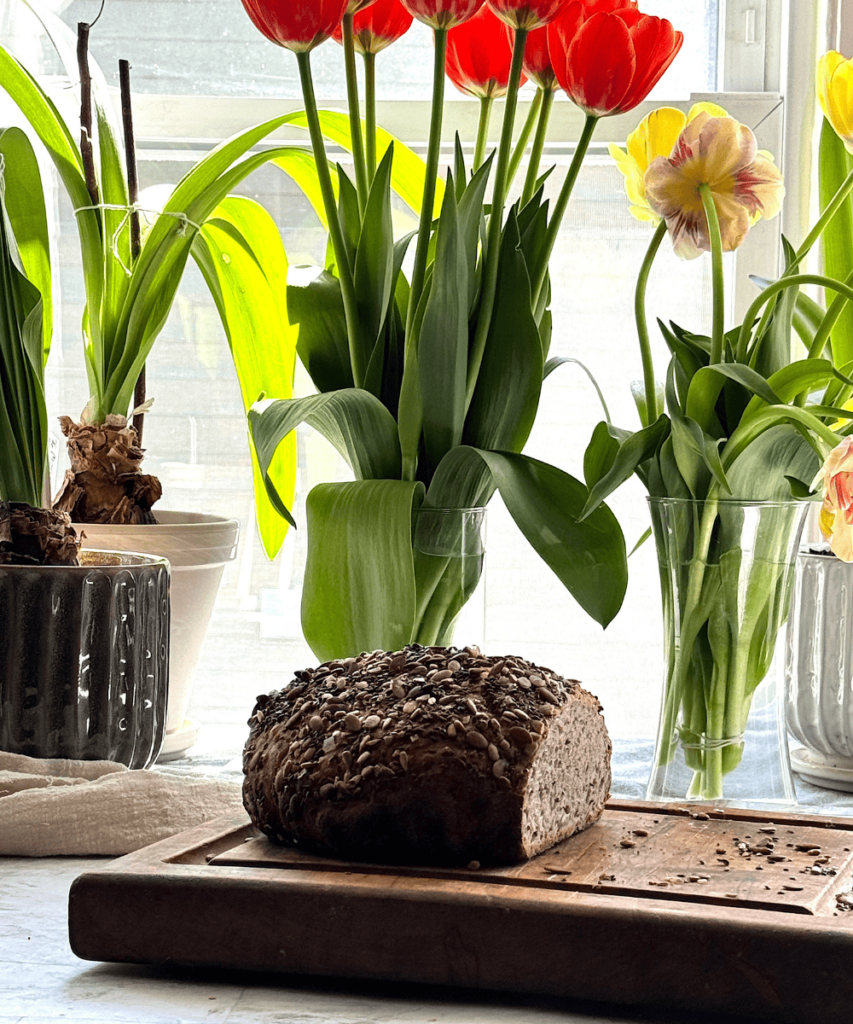
Bread is probably the number one reason I started this blog. Besides seeing my family every time I went back to Norway, one of the most thrilling reunions was with the seeded, whole-grain breads that are so common and beloved all over the country.
There’s a distinctiveness to Nordic bread that’s hard to find elsewhere, especially in the United States. Even the whole grain breads I find here are too light and fine in texture and flavorless compared to the robust, hearty Nordic breads.
So I devoted myself to exploring and researching different breads I had grown up with and created my own ‘portfolio’ of bread recipes I could share with my American audience.
You are probably reading this because you too, have tried Norwegian or Nordic bread and wish there was an equivalent stateside.
A lot of my readers are also students of my online Norwegian bread course, and a couple of months ago, I released the follow-up to this best-selling course all about Norwegian flatbreads.
If you’re as enamored with Norwegian bread as I am, I invite you to delve deeper into its world with my unique courses. They’re available for instant download, offering you lifetime access to the secrets of Nordic bread baking.

People often deter themselves from baking their own bread because they perceive it as time-consuming and complex. But fear not; this recipe is a game-changer. It employs a no-knead method, meaning it requires minimal effort and no special skills or prep time.
Don’t have a stand mixer?
No problem at all, none is needed.
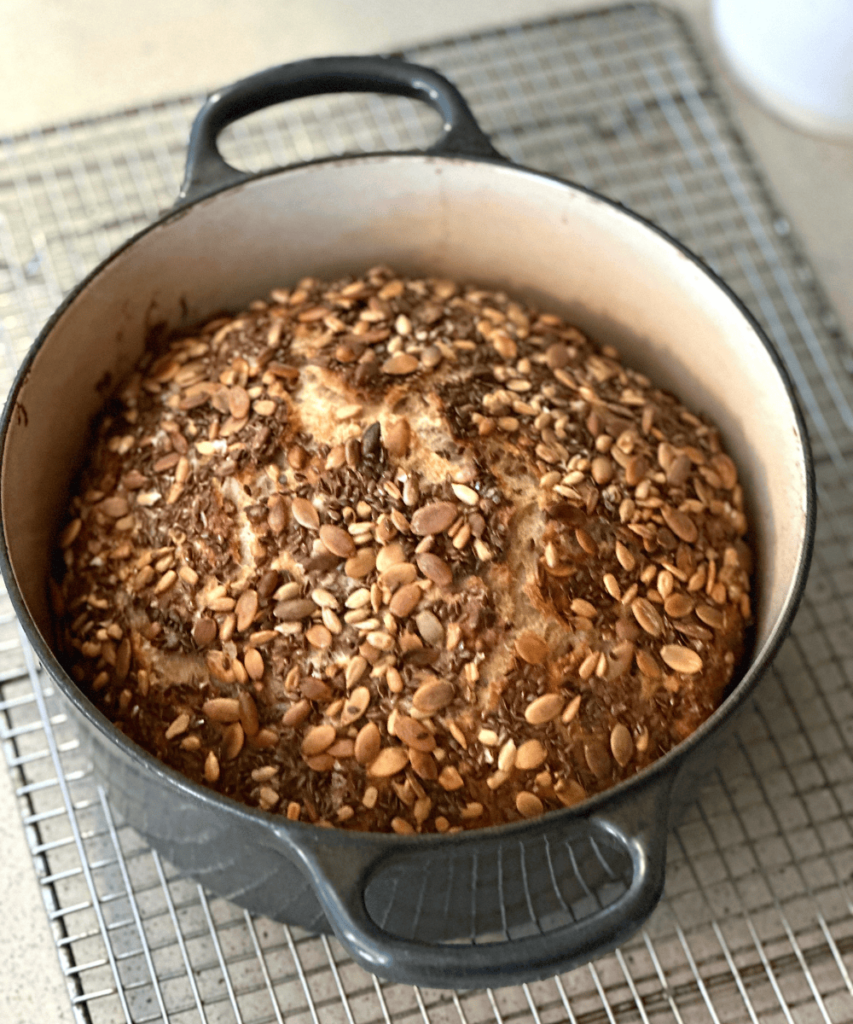
In fact, as long as you have a bowl, a wooden spoon to mix the ingredients together, and a Dutch oven, you’re good to go. Baking the bread in a preheated Dutch oven creates a steamy environment, which helps develop a crisp and crackly crust, a hallmark of artisan-style bread.
Dreading the time it takes to knead the dough by hand?
No kneading, as the recipe implies, is needed.
It will take you a maximum of 5-10 minutes to combine all the ingredients in a bowl, place the bowl on your kitchen counter, and leave the dough overnight to ferment. The extended fermentation allows the yeast to work its magic, developing complex flavors in the bread. This results in a more flavorful loaf than other quick-rise breads.
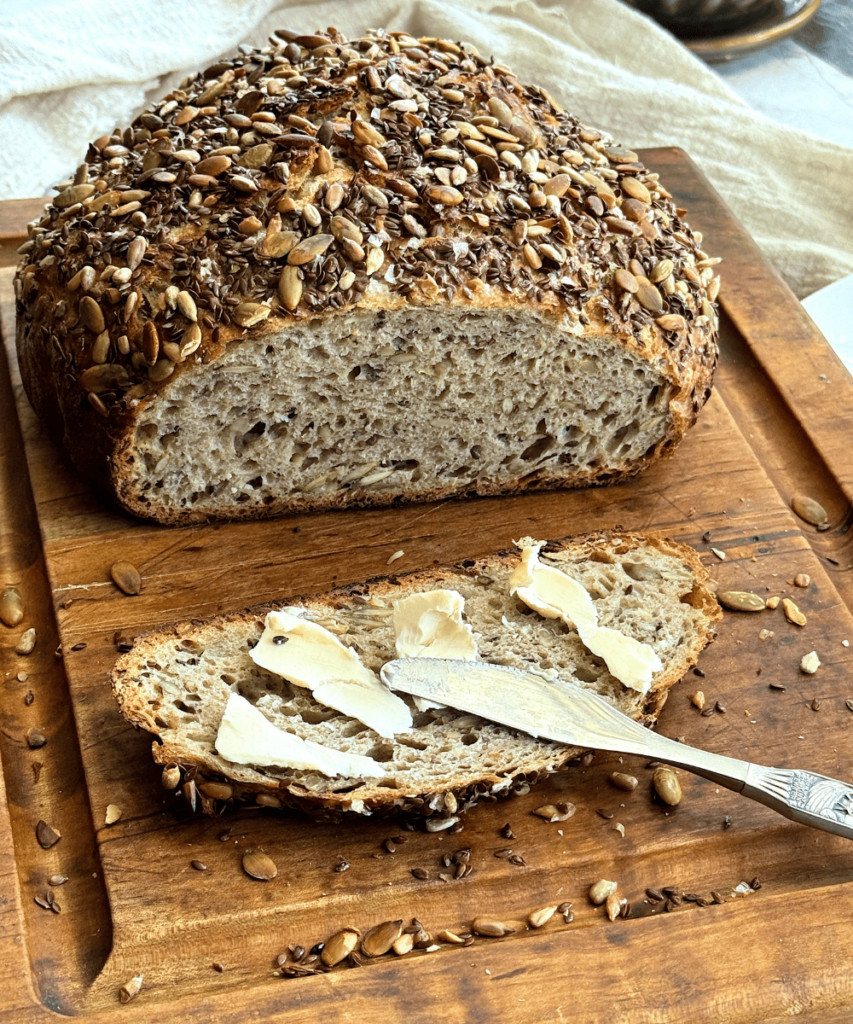
Despite no kneading, the dough undergoes a slow fermentation process, which develops gluten naturally and creates a beautifully textured loaf with air pockets and a chewy crumb. So heavenly!
I also love this method’s versatility. You can experiment with different ingredients, such as flour and seeds, and create a wide range of flavors and breads.
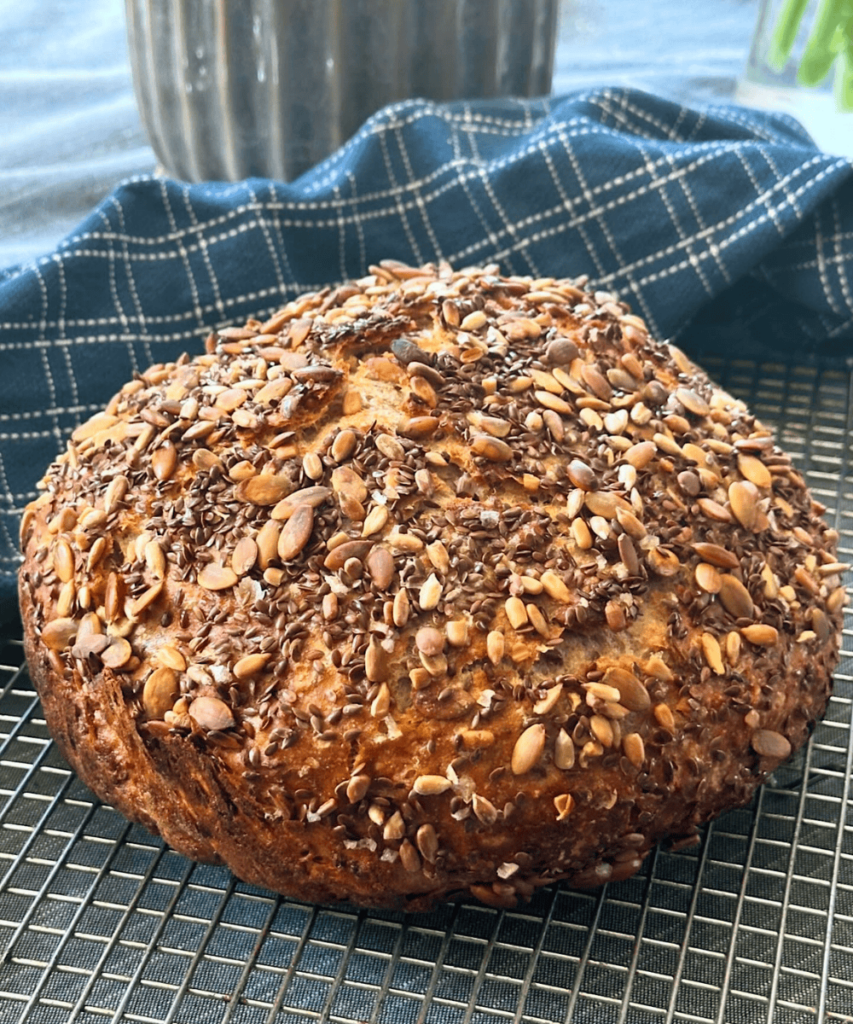
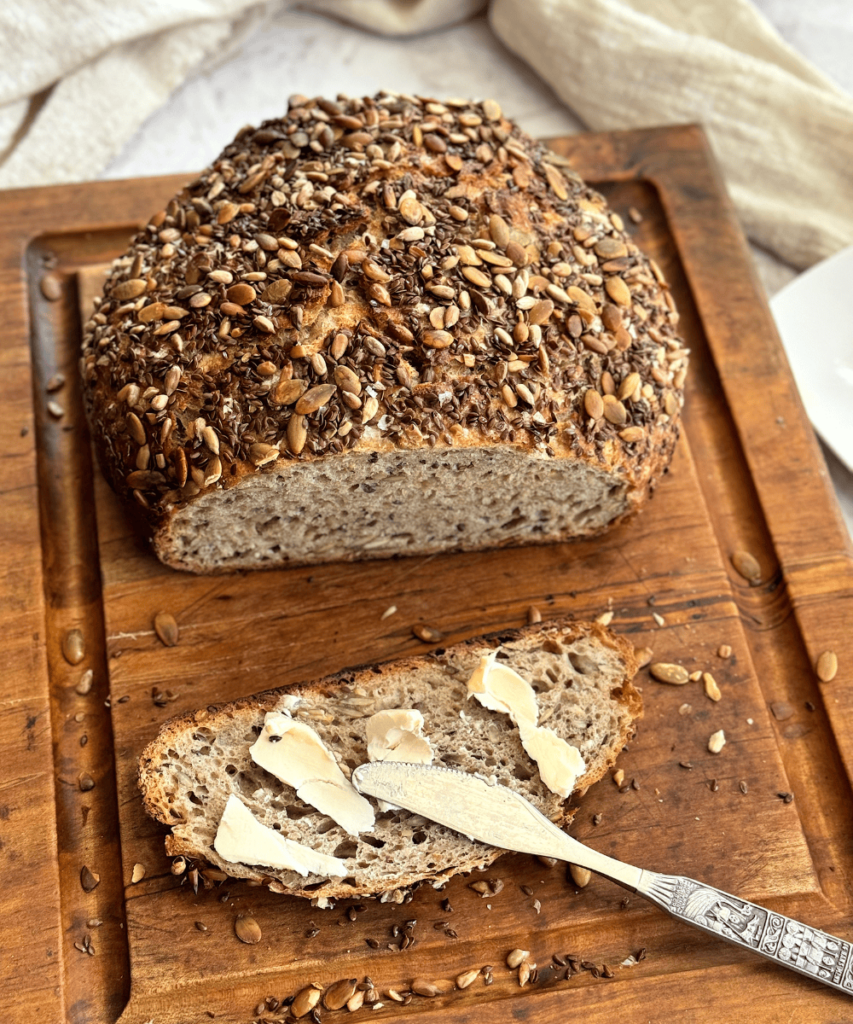
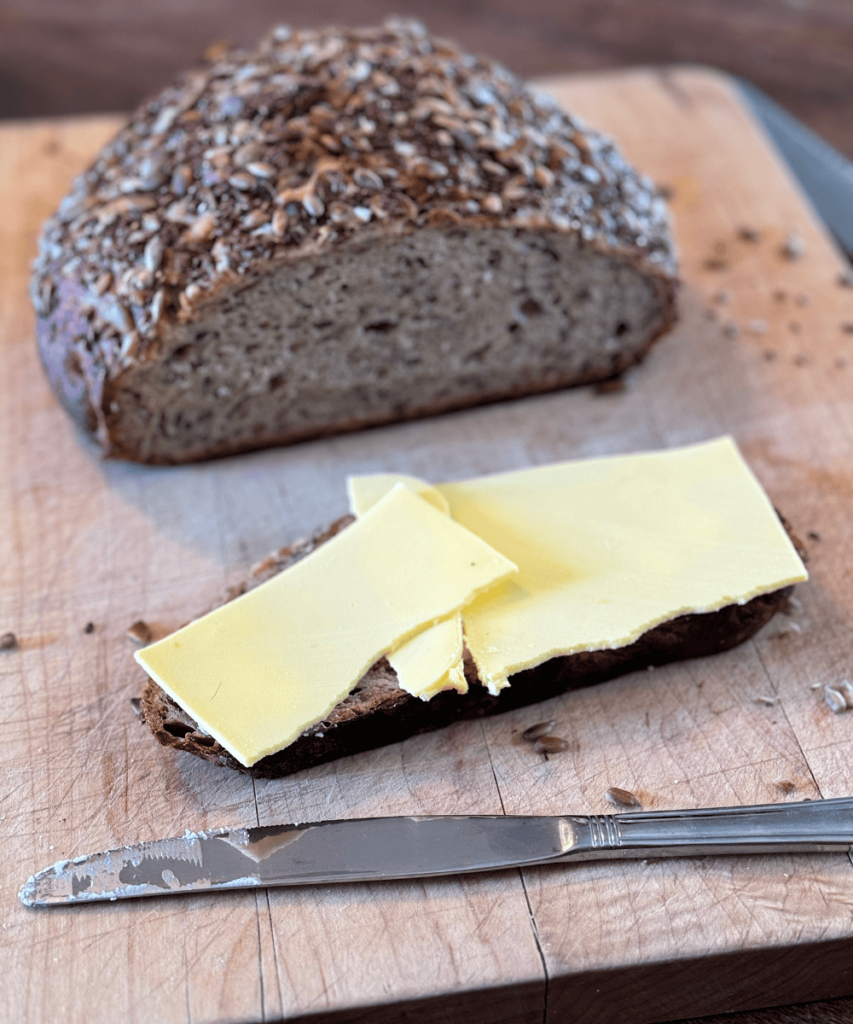
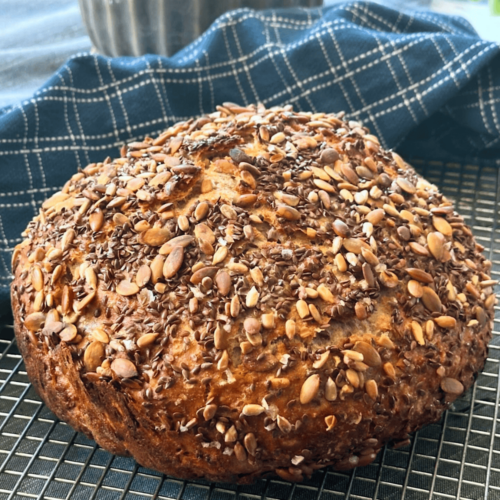
Today’s bread combines rye, whole wheat, rolled oats, and white flour with sunflower seeds, pumpkin seeds, and golden and brown flaxseeds. This combination is common in many Norwegian breads and produces such a satisfying flavor and texture. You can also feel good about eating this bread as it contains a variety of nutritious ingredients, providing vitamins and minerals—and lots of fiber!
Join me in my journey of baking no-knead bread – you’ll get as addicted as I am! 🙂
Seeded Whole-Grain No-Knead Norwegian Bread
For the bread:
1 cup (130 grams) whole wheat flour
1 cup (100 grams) dark rye flour
3 cups (360 grams) all-purpose flour
½ cup (50 grams) rolled oats
¼ cup (30 grams) sunflower seeds
¼ cup (30 grams) pumpkin seeds
¼ cup (30 grams) brown flaxseeds
½ teaspoon active dry yeast
1 tablespoon kosher or sea salt
1 teaspoon sugar
2 ½ cups (6 dl) water, room temperature
For the topping:
A drizzle of olive oil
Extra sunflower, pumpkin and brown flaxseeds
Sprinkle of large flakey sea salt
To make the bread:
Combine all the ingredients in a large mixing bowl. The mixture should be quite sticky/wet but not soupy. Adjust with a little bit more flour if it seems too wet or a little more water if it seems too dry/firm. Cover the dough with plastic wrap or a clean kitchen towel and let it sit on your counter for 12-20 hours (overnight).
After the initial resting period, wet your hands to prevent sticking. Place the dough onto a lightly floured work surface. Gently reach under one side of the dough, lift it, and stretch it upwards, then fold it over towards the center of the dough. Repeat this process from all four sides, essentially folding the dough into a rough square or rectangle. (You can also do this process in the bowl instead of on the counter, if you prefer) Place the dough seam side down and let it rest covered by the bowl for 30 minutes to 1 hour.
Second Fold (Optional): If you feel the dough needs more structure, you can repeat the folding process after another 30 minutes to an hour of resting.
30 minutes before baking, place a Dutch oven with the lid on the lowest rack in the oven and preheat the oven to 450°Fahrenheit (225°C).
When ready to bake, carefully remove the Dutch oven from the oven, remove the lid and pour a touch of vegetable or olive oil on the bottom of the pan and place the bread inside. Drizzle with a little olive oil, sprinkle with a combination of seeds and a pinch of flakey sea salt. Cover with the lid and place back in the oven.
Let the bread bake for 30 minutes, then remove the lid and bake for another 15 minutes uncovered until golden and crisp on top.
Remove the bread and let sit in the Dutch oven for about 5-10 minutes before gently removing the bread and placing it on a rack to cool completely before slicing.

Seeded Whole-Grain No-Knead Norwegian Bread
Ingredients
For the bread:
- 1 cup (130 grams) whole wheat flour
- 1 cup (100 grams) dark rye flour
- 3 cups (360 grams) all-purpose flour
- ½ cup (50 grams) rolled oats
- ¼ cup (30 grams) sunflower seeds
- ¼ cup (30 grams) pumpkin seeds
- ¼ cup (30 grams) brown flaxseeds
- ½ teaspoon active dry yeast
- 1 tablespoon kosher or sea salt
- 1 teaspoon sugar
- 2 ½ cups (6 dl) water, room temperature
For the topping:
- A drizzle of olive oil
- Extra sunflower, pumpkin and brown flaxseeds
- Sprinkle of large flaky sea salt
Instructions
To make the bread:
- Combine all the ingredients in a large mixing bowl. The mixture should be quite sticky/wet but not soupy. Adjust with a little bit more flour if it seems too wet or a little more water if it seems too dry/firm. Cover the dough with plastic wrap or a clean kitchen towel and let it sit on your counter for 12-20 hours (overnight).
- After the initial resting period, wet your hands to prevent sticking. Place the dough onto a lightly floured work surface. Gently reach under one side of the dough, lift it, and stretch it upwards, then fold it over towards the center of the dough. Repeat this process from all four sides, essentially folding the dough into a rough square or rectangle. (You can also do this process in the bowl instead of on the counter, if you prefer) Place the dough seam side down and let it rest covered by the bowl for 30 minutes to 1 hour.
Second Fold (optional):
- If you feel the dough needs more structure, you can repeat the folding process after another 30 minutes to an hour of resting.
- 30 minutes before baking, place a Dutch oven with the lid on the lowest rack in the oven and preheat the oven to 450°Fahrenheit (225°C).
- When ready to bake, carefully remove the Dutch oven from the oven, remove the lid and pour a touch of vegetable or olive oil on the bottom of the pan and place the bread inside. Drizzle with a little olive oil, sprinkle with a combination of seeds and a pinch of flakey sea salt. Cover with the lid and place back in the oven. Let the bread bake for 30 minutes, then remove the lid and bake for another 15 minutes uncovered until golden and crisp on top.
- Remove the bread and let sit in the Dutch oven for about 5-10 minutes before gently removing the bread and placing it on a rack to cool completely before slicing.

Sunny,
I was looking for a bread to make that was hearty and reminded me of the loaves that my friends reminisced about from their youth in their homeland of the Netherlands, Scandinavia and Norway and this sounded like it! So, I gave it a try over the weekend and it was a hit! I started it on Saturday and let it sit for 15 hours before baking very early on Sunday morning and the house smelled absolutely heavenly! I even had a neighbor come over who was out weeding and asked what I was baking so early! Anyway, I followed your recipe exactly as you instructed with the exception of the dark rye flour, I only had light rye flour and it came out just as your photo! I cannot believe the flavors! They are dynamic and entice your palate in a delightful way. I shared the bread with my family and friends with some choices of nut butters, a rosemary butter, some Jarlsberg & Cheddar. They devoured the loaf~I have 2 more proofing as I send this off to you! Thanks so much for sharing this righteous bread~
Hi Susan- How wonderful to read your comment,thanks so much for sharing with me! I’m so happy you and your family enjoyed my recipe. It is my husband’s favorite too, and he will have no other bread than this after I started making it, lol! Enjoy and thanks again for your kind note!
Hi, I have no rye flour, can I use more whole wheat flour to replace it?
Thanks
Hi Chavez- yes you may! 🙂